Receiving DVB-S Signals – Windows + SDRAngel
NOTE: There is an update to SDRangel incoming that will add support for displaying MER (signal quality) during reception. This will be in version v6.5.6. Keep an eye on the sdrangel page for new versions.
Receiving under Windows using SDRAngel
SDRAngel is a pretty feature-packed SDR application, with all sorts of interesting plugins – including the ability to demodulate DVB-S! It’ll work with a range of SDRs, but this guide will focus on reception using a RTLSDR.
Note that SDRAngel’s DVB-S demodulator is not amazing, and won’t perform as well as a dedicated DVB-S receiver. Unfortunately I haven’t found any other alternative software for receiving DVB-S under Windows using a SDR.
Installing the right drivers for your RTLSDR
- Download the ‘Zadig’ driver installer from here: https://zadig.akeo.ie/
- Plug in your RTLSDR. Windows will probably try and install some drivers. Let that complete before continuing.
- Run the zadig executable as Administrator (right-click and ‘Run as Administrator’)
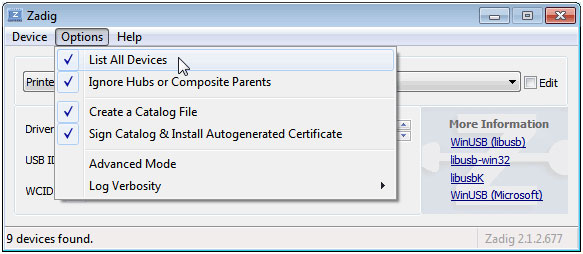
- Go to the Options menu and enable ‘List All Devices’
- Select “Bulk-In, Interface (Interface 0)” from the drop down list. Note on some PCs you may see something like RTL2832UHIDIR or RTL2832U instead of the bulk in interface. This is also a valid selection. Do not select “USB Receiver (Interface 0) or Interface 1” or anything else or you will overwrite that driver! Double check that the USB ID shows “0BDA 2838 00” as this indicates that the dongle is selected.
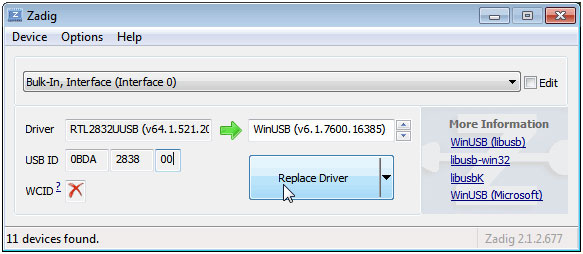
- Ensure that WinUSB is selected as the new driver (see above), and click the Replace Driver button.
- On some PC’s you might get a warning that the publisher cannot be verified, but just accept it by clicking on “Install this driver software anyway”. This will install the drivers necessary to run the dongle as a software defined radio.
Note that you may need to run zadig.exe again if you move the dongle to another USB port, or want to use two or more dongles together.
Installing SDRAngel
The latest version of SDRAngel for Windows (64-bit only!) can be downloaded from here:
https://github.com/f4exb/sdrangel/releases (look for the win64.exe installer)
Download and run the installer. You may also get a Windows Defender notification, just click ‘More Info’ and then ‘Run Anyway’. You should end up with a shortcut in your start menu.
Setting up to Receive DVB-S
- Open SDRAngel from the start menu shortcut. It can take quite a while to load, and sometimes will even just hang on the splash screen. If this happens, just try loading it again. You may also get a Windows Defender notification, just click ‘More Info’ and then ‘Run Anyway’.
- When you first startup SDRAngel, you’ll presented with this screen:
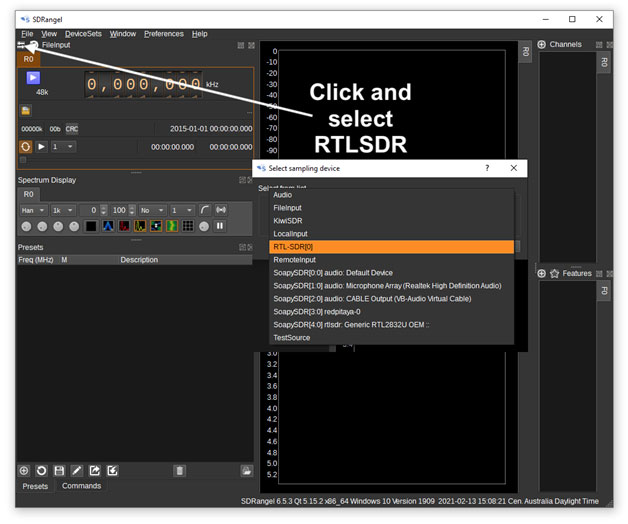
- Select the indicated icon, and choose the RTLSDR entry from the list. If you don’t see a RTLSDR entry, you might not have installed the drivers correctly.
- Now, we need to set up the RTLSDR Input device.
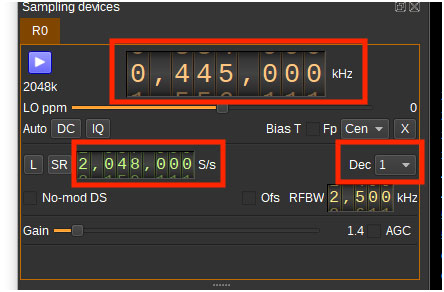
- Adjust the sections marked in red to match the provided values. The frequency indications can be set by clicking on the digit you wish to change, and using the up/down arrow keys. It’s a bit of a pain. We want to adjust the following settings:
- Frequency: 445 MHz
- Sample Rate: 2.048 MHz
- Decimation: 1
- You can also enable a Bias T output if you need to power a coax-powered preamp.
- You will probably want to adjust your gain to somewhere around the middle (30 dB) to start with. If you can’t see the gain slider, you may need to drag down on the line of dots at the bottom of the Sampling Devices section to expand it.
- It’s also a good idea to click the Auto ‘DC’ button, to remove any residual DC offset your SDR may have.
- You should now be able to click the blue Play button to the left of the main frequency entry. A waterfall display should start:
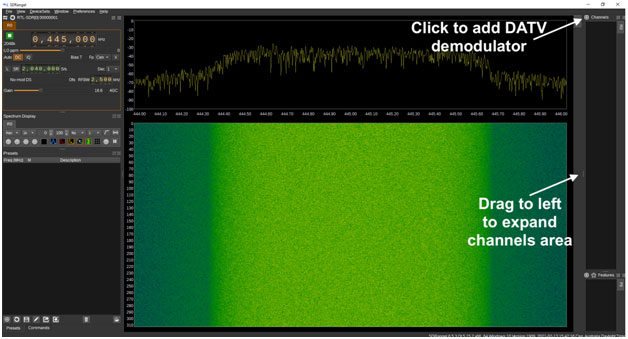
- If it does *not* start, and SDRangel locks up, then it’s probably because you haven’t installed the Zadig drivers.
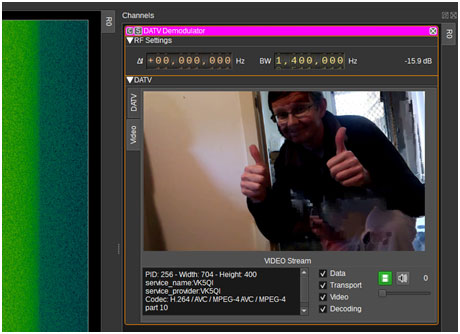
- Now we need to start a DATV demodulator. Expand the ‘Channels’ area as indicated in the above image, then click the ‘+’ button next to the ‘Channels’ label. Select ‘DATV Demodulator’ from the list, click ‘Apply’ then ‘Close’. A new section will appear on the right of the screen in the ‘Channels’ area. You can expand this area by dragging the divider between it and the waterfall area.
- We now need to configure the DATV Demodulator as follows:
- Bandwidth: 1.4 MHz (1,400,000 Hz)
- Demodulator type: DVB-S, QPSK, ½
- Symbols/s: 1000000 (1Msps)
- Viterbi: Enabled (Note: On anything less than a i7 this should probably be turned off, as it uses a lot of CPU – you will suffer a 3-4 dB performance penalty though!)
- Allow Drift: Enable this too (helps if the TX or RX is off-frequency)
- UDP: Click to enable (button will turn orange)
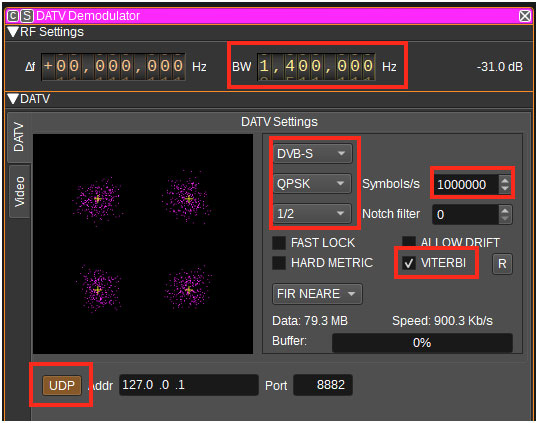
- If you’re receiving a signal, you should now be seeing pink dots appearing in the QPSK constellation area. If the pink dots are grouped around the four crosses (the four QPSK symbols), then it means you’re receiving a signal! Sometimes you need to adjust the frequency offset settings (marked f) to get a good lock. With any luck, the Data indication will now start increasing indicating you are receiving video.
- You should now be able to click the ‘Video’ tab (just to the left of the constellation diagram), and view the video stream:
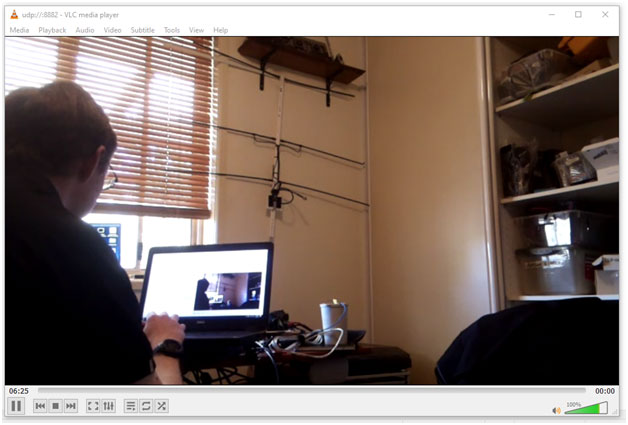
- The video window in SDRangel is a little bit small, but we can get a bigger view by making use of the UDP video streaming output we enabled earlier. To do this, you will need to install the VideoLAN Player (VLC) available here: https://www.videolan.org/vlc/index.html
- Open up VLC, then go to Media -> Open Network Stream
- In the network URL box, enter: udp://@:8882 and click ‘Play’. A firewall box may appear, and you may need to enable VLC access to the local network.
- If you are receiving signals, you should now have the transport stream playing in VLC: