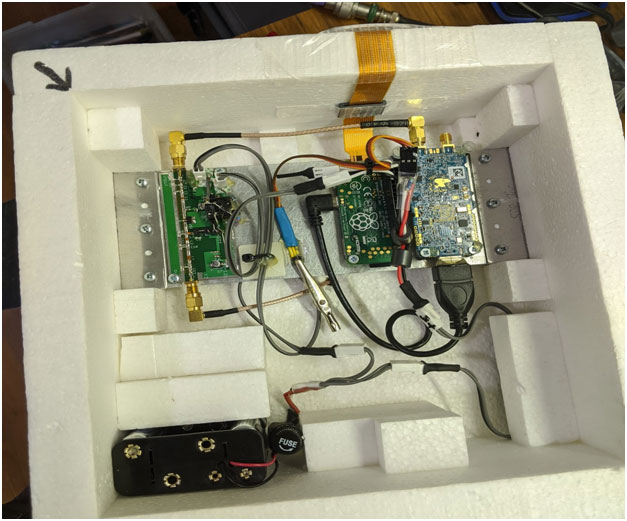
Figure 1 – DVB-S Payload Internals. Left-to-right: G4BAO 70cm driver amp, Raspberry Pi Zero W, LimeSDR Mini. 12v battery pack at bottom-left
Introduction
Upcoming Project Horus launches will feature a first for the project – live video! While we have launched many GoPros and still image cameras in the past, live video was always something on the bucket list. With modern advancements in Software-Defined Radios, it’s become relatively easy to piece together a digital video transmitter suitable for use in a high-altitude balloon payload.
This document provides some information about the transmitter, and what equipment and software is required to receive the live video during one of our balloon launches. The first few launches will be using relatively low data rates, such that reception should be possible with a fairly modest receiver setup.
Transmitter Payload Overview
The aim of this payload is to capture live video, perform video compression, and then modulate the video onto a RF signal. I have chosen to use the DVB-S (Digital Video Broadcast – Satellite) standard for a few reasons:
- It’s widely supported by a range of free and open-source software, both on the transmit and receive sides.
- DVB-S uses single-carrier QPSK, which has somewhat laxer requirements on amplifier linearity than multi-carrier standards like DVB-T.
- It’s possible to encode DVB-S on a low-power platform such as a Raspberry Pi Zero W (DVB-S2 is a bit much for it)
Unlike many other groups that have launched video transmitter payloads on the 23cm band, I’ve chosen to run ours on the 70cm band. We have plenty of spectrum between 440 and 450 MHz which is relatively un-used, and we know all the local users of it (EARC’s DVB-T repeater, and the DVB-T repeater up at Pt Pirie) and can coordinate with them. Using 70cm also means we have less path loss to deal with, increasing our chances of getting a decent video stream.
The DVB-S payload is based around a LimeSDR Mini, running custom firmware developed by F5OEO to help offload some of the modulation work onto the LimeSDR’s FPGA. Capture and compression (H264) of video is performed by a Raspberry Pi Zero W, using a PiCam v2.1, and running open-source encoding software available here: https://github.com/darksidelemm/dvbsdr
The output signal from the LimeSDR mini (~10 mW) is amplified to approx 800mW using a G4BAO 70cm driver amplifier.
The RPi, LimeSDR Mini, and amplifier are all mounted to an aluminium heat spreader plate manufactured by Peter VK5KX, which helps dissipate the ~7W of heat the entire system produces during operation. Software on the RPi monitors the temperature of the heat spreader plate and will cut power to the amplifier and LimeSDR (~6W of power) if it gets dangerously hot.
The entire payload draws about 8W for the <1W of RF power it generates – not particularly efficient! It’s expected to have about 4 hours of battery life, more than enough for a typical High-Altitude Balloon flight.
For the first launch, we are going to use the following transmitter settings:
- Transmit Frequency: 445 MHz
- Transmitter Power: ~800mW
- Transmitter Polarisation: Vertical (!!! – Those with Horizontal Yagis watch out!)
- Modulation: DVB-S, QPSK, r=½ FEC
- Symbol Rate: 1Msps
- Video Resolution: 704×400
This will produce fairly low quality video, but will give the best chance for the payload to be received. Once we understand what the achievable signal-to-noise ratio (SNR) is for a typical flight, the symbol rate (and image quality) can be increased on future launches.